Peach Cobbler

Standard

Canned peaches are just the best thing.  I remember the first time I saw them—note I said saw and not ate—I was seven and still lived in the Philippines.  Though I remember a mostly fun childhood I was also aware that maybe we didn’t have as much as others.  I say ‘maybe’ because as a kid as long as you have enough of the basics and it’s all you’ve ever known you don’t really think much about your station in life.  I also say ‘maybe’ because that feeling of being deprived and not having enough lurks about every now and again.  Said feeling crept in when I first saw a cousin eating forkfuls of the fifteen-ounce Del Monte peaches straight out of the can, finished every slice then tipped the can into his mouth and drank the syrup.  He and I sat in stony silence while he slurped every drop and I watched.  

I make this awesome peach cobbler every time with canned peaches, partly because canned peaches are a reminder of that childhood feeling of wanting and not having and that in this country, as long as you work hard the fifteeen-ounce Del Monte canned peaches are within reach.   That and peeling, par boiling and removing the pit from fresh peaches are way too many extra steps for me.

Recipe:

2 15 oz cans cling peaches with syrup
1/2 cup butter
1 cup sugar
1 cup flour
1 cup milk
2 tsp baking powder
Turbinado sugar (optional)*

Instructions:

Preheat oven to 350 degrees.  

Melt butter and pour into a 9×12 baking pan.  Pour in 2 cans of peaches, syrup and all.  Mix sugar, flour, baking powder and spread over the peaches.  You can do this in one of two ways.  You can either pour the batter and spread it over the peaches with an offset spatula.  Or you can use an ice cream scoop and scoop it over the entire pan of peaches.  

Bake for about 25 minutes.  Remove from the oven and sprinkle the turbinado sugar over the cobbler which by now should be starting to brown.  Return to the oven and bake another 15 minutes until cobbler is bubbly and golden brown.

A9E36CA5-7BB7-4D65-AAEC-7EA2E3F8837C

*You don’t have to use the turbinado sugar but it gives the cobbler a nice sugary crunch when you bite into it.  So maybe don’t make it optional.  

Advertisement

Keep Calm and Kare Kare On

Standard

2018 was a rough year.  At times, it felt like it was devoid of kindness, basic human decency and just plain old decorum.  And I’m just talking about 45.  The news was increasingly hard to watch with Stormy Daniels, mass shootings, Supreme Court confirmation hearings–it was all too much.

Enter: Kare kare (pronounced car-eh car-eh).  Kare kare is a Filipino dish of oxtail stew with an assortment of vegetables all braised in a peanut sauce and served with salty shrimp paste. Kare kare is above all else comfort food. It’s the culinary equivalent of a warm blanket, fuzzy slippers, and a hot toddy which means you can use a whole steaming platter of it just about now, while you watch the undoing of the Affordable Care Act and the events of the government shutdown unfold.

In my family, this is the dish that emerges from the kitchen in a giant dutch oven and arrives at the table, surrounded  by relatives with plates in hand, almost salivating  in amazement. Nothing I’ve ever cooked has ever received that kind of a reception, so after much texting and reassurance from Tito Boy, the best kare kare maker ever, I attempted this dish.

I made it in my Instant Pot which I procured from Amazon as a Black Friday deal from 2 years ago. Until recently, I had never used it because pressure cookers scare me.  But the Instant Pot is great under pressure (ha!) and is a handy, versatile tool.

img_1383

Ingredients:

  • 1 lb beef stew meat
  • 1-2 lbs oxtail
  • 2 Filipino or Chinese eggplant, sliced 1/2 inch long
  • 1 bunch long beans
  • 4  baby bok choy
  • 1 cup peanut butter (creamy, never chunky)
  • 3 cups beef broth
  • 1 beef bouillion cube
  • 1 tbsp. fish sauce
  • 1 tbsp. annatto powder
  • 1 medium-sized onion, sliced in wedges
  • 4 cloves garlic, chopped
  • shrimp paste
  • salt and pepper
  • vegetable oil


Procedure:

1. Select the ‘saute’ setting on your Instant Pot and brown the meats in one tbsp. of vegetable oil.  When browned, set aside.

2. Saute onions and garlic until translucent. Deglaze the pot with 1 cup of beef  broth and 1 tbsp. fish sauce. Let the broth boil and put back the meat in.  Add 2 more cups of broth, or enough until the meat is submerged.

3. Close the lid of your Instant Pot and change the settings to ‘pressure cook/manual’ and ‘high’ for 35 minutes.

4. While waiting for the meat to cook, prepare your vegetables. Fry the eggplant, and blanch the bok choy and long beans.

5.  When cooking is complete do a quick release, take out the meat and set aside.

6. Stir in the peanut butter.

7.  Mix 1 tbsp of annatto powder with 2 tbsp of broth.  Then add the broth/annato concoction into the pot and watch it turn into the beautiful orange color kare kare is known for.  Annato is not optional, as other blogs will tell you.  Trust.

8.  Adjust the seasonings according to preference by adding fish sauce, salt and pepper.

9. Once you are satisfied with the taste and *consistency of the sauce, add the meat in.  Stir in the vegetables.

10. Serve with hot rice and spicy shrimp paste on the side.


Super secret pro tip:  Tito Boy mixes in a few teaspoons of salted shrimp paste in his famous kare kare.

A brief tutorial on shrimp paste from an Americanized Pinay (so take it with a grain of salty bagoong):

  • The Tagalog word for shrimp paste is bagoong.
  • Bagoong comes  in a sauteed and raw version.  For kare kare, use only the sauteed version.  I don’t know why, it just tastes better.
  • There are different brands but the Barrio Fiesta pictured below is the only one I use.  It’s the only one Tito Boy uses too, so I’m assuming it’s the best.
  • I prefer spicy bagoong to the salty as it gives the dish more of a kick.
  • Bagoong is shockingly salty.  Take a scant teaspoon–less than scant–top your kare kare with it and enjoy with hot rice.

img_6645img_6646

Beef Mechado

Standard

I have a major crush on my Instant Pot,  so much so that I’ve been secretly cheating on my other crush the Crock Pot.  The Crock Pot is OK.  It’s a little slow, makes you wait for it all day and it even forces you to brown your food in another pot.  It’s no wonder the Instant Pot and I hit it off, well, instantly.  You can brown in the sauté setting, take the toughest cut of meat and once it gets pressurized, you’re 35 minutes away from dinner.

The Instant Pot is the perfect vehicle for stewing and braising so I experimented with beef mechado, a rich and flavorful tomato based Filipino beef stew. The obsession with beef mechado started with my Mom who buys and freezes mechado by the pint from a nearby Filipino restaurant.  At 6$ a pint, I thought I’d try to recreate this at home.  Ever the resourceful Pinay mom, she even called the restaurant to find out the cut of beef they use and how they get the meat so tender.  She learned that they pressure cooked the beef and instead of cutting the beef into chunks, beef stew style, they cut it in slices–so revolutionary!  Kudos to Mom who’s been cracking life’s secrets all this time without ever having to Google.

Ingredients:

  • 4-5 lbs beef chuck roast, cut into 1/4 inch slices
  • 1/4 c calamansi or lemon juice
  • 3/4 c Silver Swan soy sauce*
  • 1 t sugar
  • pepper, to taste
  • 15-oz can tomato sauce

Procedure:

Marinate beef in lemon juice, sugar and soy sauce mixture at least 4 hours, preferably overnight.  Drain the beef and set aside the marinade, don’t throw away as you’ll be using this as the braising liquid.  Oil the bottom of your Instant Pot and brown the beef  in batches.  Don’t worry about cooking it all the way through as you’ll be pressure cooking it to tender goodness.  To your browned beef, add the tomato sauce and the marinade you set aside.  Set your Instant Pot to Meat/Stew and pressure level to high pressure for 30 minutes.

Notes/Variations:

  • I added red bell pepper after I finished cooking the beef and pressure cooked it another 10 minutes.  I thought that was too long as the beef totally fell apart.  Some slices turned into shredded beef which I’m not crazy about.  I prefer tender but still in tact beef slices so next time, I’d cut it down to 25 minutes for pressure cooking the beef and then an additional 10 minutes for bell pepper.  Same rule applies if you wish to add potatoes.
  • I cooked down the sauce for an even more concentrated tomatoey flavor by putting the Instant Pot on the sauté setting, high.  That may have also contributed to the beef falling apart.
  • You can substitute toyomansi, which is a Filipino say sauce mixed with calamansi juice, for soy sauce like I did the second time I made this.  It was good, but it came out a little too tangy for me.  Adding a little more  sugar helps cut the tanginess.
  • When choosing your chuck roast, pick one that’s a little more fatty with a lot of marbling throughout.  That fat means juicy, moist flavor.


IMG-5746

44548312_10155560287941401_5721082629399248896_n


Island Garlic Shrimp

Standard

No trip to Hawaii would be complete without a trip to a shrimp truck or as my friend Ben calls it, “Scrimps Shack”. The Scrimps Shack and Giovanni’s are two of my favorites. I remember a particular trip to Oahu, Pru and I were still kidless and so we aimlessly just drove around.  While driving along H1 en route to North Shore, we happened upon a shrimp truck that I thought was Giovanni’s. We followed it for a good ten miles before I realized it wasn’t a shrimp truck at all but just a janky refrigerator repair van. That’s how much I love the world famous Kahuku shrimp, so named for the sleepy town in the north east part of the island from which these freshwater shrimp are farmed.

IMG_4232

Not much to look at but from that truck comes the most amazing garlic shrimp

IMG_4231

We sadly are not making it to the islands this year so we are bringing some of that island food to the mainland.

Ingredients

1 lb medium shrimp (21/25 per lb)
3 cloves garlic, finely chopped
6 cloves roasted garlic*
1 stick butter
1 1/2 cup white wine
1/2 cup lemon juice
3-4 tbsp olive oil
1/4 tsp chili pepper flakes
1/2 tsp Italian seasoning
1/2 cup grated Parmesan cheese
salt and pepper to taste
1 tbsp Italian parsley

Procedure

*How to make roasted garlic: Drizzle garlic cloves with olive oil and sprinkle with salt. Bake cloves of garlic in a sealed aluminum foil packet in a 350 degree oven for 20 minutes. When done, remove from oven and this should be soft enough to mash with a fork. Set aside.

IMG_4236

Sautéx shrimp in olive oil until just pink and no longer translucent.  Remove from pan and set aside. Saute garlic in butter and olive oil, being careful not to burn. Add roasted garlic, wine and lemon juice to the pan. Sprinkle grated parmesan cheese over the mixture. Cook for 10-12 minutes until reduced to half. Place shrimp back in pan and add Italian seasoning, chili pepper flakes, salt and pepper to taste.

IMG_4235

Peaches and Her: Peach Crumble Pie

Standard

I am challenged by dough and crusts.  I find dough in general intimidating because it demands precision, accurate measurements, kneading, rolling, cutting–it’s all too much for a casual baker like myself.  Crusts are worse because they’re supposed to be buttery and flaky and don’t even get me started on that blind baking thing.  In short, dough for me is the human equivalent of your catholic school nun and the crust, her wooden ruler.

So I get around all that anxiety by using ready made pie crust and making a crumble.  A frozen pie crust is good to have around in your freezer for that easy pecan pie or peach pie you’d like to whip up at the last minute.  My favorite is the Marie Callender brand, (RIP Marie Callender and your creamy artichoke chicken.)  The crumble is for the crispy, sweet bites of buttery sugar to counteract the softness of the peaches.

Recipes I’ve found called for fresh peaches you have to par boil for a bit in order to peel the skin and then you still have to de-pit it.  Once again, ain’t nobody got time for that.  In this blog, we do shortcuts and shortcuts come in the form of canned peaches.  You’re welcome.

Ingredients

  • 1 9-inch pie shell
  • 2 cans of peaches – 14 oz, drained
  • 1/2 cup melted butter
  • 3/4 cup white sugar
  • 3/4 cup brown sugar
  • 1 cup flour
  • 1/2 teaspoon ground ginger
  • 2 pinches salt
  • 1 tablespoon cornstarch

Procedure

Preheat the oven to 375 degrees.

To make the crumble:

In a medium sized bowl, whisk together sugars, flour, ginger and salt. Add melted butter and stir until mixture comes together. Don’t be alarmed if the crumb topping starts to look like dough.  Keep stirring until you can break it up into smaller pea-sized clumps.

36835497_10155325720496401_500475389198467072_n

To make the peach filling

In another bowl, toss the peach slices with the cornstarch and about ¾ cup of the crumble. Pour peaches into the pie crust.

36762816_10155325720581401_5763886806047129600_n

Top the peaches with the rest of the crumble and if you don’t cover all the peaches, it’s all good.  They’re like little rays of sunlight peeking through your crumble.

36766542_10155325720756401_7948238723898933248_n

Place your pie pan on top of a baking sheet to avoid spillage in your oven and bake for 45-50 minutes or until filling is bubbly and topping is golden brown.

36739811_10155325816826401_3144174712192499712_n


Little Baobab

Standard

We said goodbye to my friend Helen a couple weeks ago by celebrating at a Senegalese restaurant, Bissap Baobab– a funky, vibrant spot that served West African food with bold flavors paired with refreshingly sweet yet tart tamarind based drinks.

Bissap Baobab is not unlike my friend Helen—funky, vibrant, refreshing, sweet and sometimes tart—but only when you irritate her.

Over the last few weeks, I’ve been thinking a lot about Helen.  I admire her for so many reasons—her courageous spirit, her compassionate soul and most of all her strength of character.  She’s a fierce tennis player, gifted artist and a nurse that is the best embodiment of nursing I’ve ever had the pleasure of working with and eventually befriending.  As we were saying our final goodbye before her move to North Carolina—I whispered to her that after all the heartfelt speeches and tributes offered by her friends, what I didn’t get a chance to say was that Helen above all else was a badass.

I’m a little ashamed to admit that I’m pairing this memory of my friend Helen with a cocktail I had that night, the Little Baobab.   It was really a perfect complement to a perfect evening.  I fell in love with it mostly because of the tart tamarind flavor.  If you’ve never had tamarind, I suggest you Google it before you put it in your mouth.  It’s unexpectedly sweet and tart and pulpy and it’s used mostly in Asian and Middle Eastern cooking. It is the base for the Little Baobab and nicely balances with the sweet passion fruit syrup.

So for you, my dear badass Helen, I raise a glass of Little Baobab.

Ingredients

3 oz Grey Goose vodka
3 oz coconut water
2 tsp tamarind paste*
2 pumps Torani passion fruit syrup
ice

*I procured the tamarind paste from a friend but you can probably find it at a Mexican grocery store.

Procedure

Combine all ingredients in a cocktail shaker.  Shake it like the badass you are.  Enjoy.

Mango Butter Mochi

Standard

Nothing says summer to me more than Hawaii.  As I’ve written in quite a few blog posts, it is a rare summer that we don’t visit the islands.  We’re skipping Hawaii this year so I am trying to bring some of that island vibe to my cooking.

Mochi is a chewy dessert that you’ll probably find at most luaus, church picnics, family parties throughout Hawaii mostly because the ingredients are easy to find and the mochi so very easy to make.  In fact, it’s best not overthink the butter mochi and appreciate it for its rich, chewy and sweet simplicity.  I added the mango just because I had a couple on hand that were starting get overripe.   The mango gave it a fruity tang that managed to cut down its buttery richness.

Tip: You’ll find that the slightly burned and caramelized corners are the best part of this dessert.

Ingredients

16 oz box sweet rice flour
1/3 cup butter, melted
2 cups granulated sugar
4 eggs
2 ripe mangoes, chopped
2 tsp baking powder
1 tsp vanilla extract
12 oz evaporated milk
13.5 oz coconut milk

Procedure

Preheat oven to 350 degrees.  Mix all the wet ingredients until combined.  Add the mochiko flour and baking powder and stern into the wet mixture until there are no more lumps.  Pour batter into a greased 9×13 pan and bake for 1 hour, until top is golden brown and set.  Cut into squares and enjoy.

Coffee is the New Black

Standard

Why?  Because coffee goes with everything.  Well, everything I like anyway.  It goes with chocolate, you can rub it on ribs.  You can drink it hot or cold.  In fact, one of my favorite cigars is Java by Drew Estate, coffee and mocha infused with nuances of mint and vanilla.  If coffee had a fashion equivalent, it would be your favorite threadbare jeans, your simple black dress, your ballet flats.  In short, coffee is timeless. 

With summer approaching, I’ve recently been enjoying my cold brewed coffee, made from beans procured from Bootstrap Joe Coffeeworks, an independent Bay Area based roasting business co-founded by two of my favorite people on earth, Jason and Glen.  Along with their college friend Nico, these three are on a quest to make “Great coffee for working people.”  Great coffee indeed, I’ve used their Sumatra Blend in my Coffee Spice ‘Rubbed for Your Pleasure’ Baby Back Ribs—recipe coming soon.  Those of you special enough to have partaken of these ribs can vouch for how awesome, rich and complex they taste, in no small part due to the coffee rub I used.

Anywhoo, cold brewed coffee is one of those things you hear about and go ‘yea, right’ because you think it’s not really a thing.  Were she alive today, my grey haired Lola Emilia in all her old Pinay wisdom would be rolling her eyes at the mere mention of this cold brewed nonsense, whilst savoring every last drop of a steaming hot cup of Taster’s Choice flavored with Coffee Mate.  But cold brewed coffee is in fact a thing that’s so simple to make, all you need are basic ingredients: good quality coffee beans from Bootstrap Joe Coffeeworks, water and time. 

Adapted from: Food 52 Magical Coffee

Ingredients

2/3 cup coarsely ground Bootstrap Joe Coffeeworks coffee
3 cups water
1 teaspoon cinnamon
3 tablespoons dark brown or turbinado sugar
1/4 cup hand torn mint leaves

Preparation

  1. In a jar, stir together all ingredients
  2. Cover and let rest at room temperature overnight or 12 hours
  3. Strain coffee over filter covered strainer
  4. Pour strained coffee over ice and add cream, milk or coconut milk to taste
  5. Let your eyes roll back momentarily in your head and enjoy


**For the sake of transparency, I do get something from Bootstrap Joe Coffeeworks in exchange for this post: fashion advice from Glen and Hayes Valley restaurant recommendations from Jason.  And a lifetime supply of cousin love.

IMG_3219


IMG_3082


Finding the EAT in S*eat*tle

Standard
When JJ turned 6, we began to ask him to weigh in on a decision that affects our budget, vacation plans and scheduling.  I know, that’s a lot to put on a six-year old.

“Would you rather have a birthday party or take a vacation?”

Every year the answer is the same: “Both.”

When asked to reign in his greed and to choose only one, he always picks vacation.  As he got older, he got more specific.  “I’d like to take a vacation in New York for one week.”  I finally asked him last year about the consistency of his answers and he simply said, “A party is only for a few hours.  A vacation lasts a long time…”

So this year, we chose Seattle as our destination based mostly on its proximity and that we’ve always wanted to see for ourselves the mythical stories about fish throwing and Starbucks and the year round rains experienced by our neighbors to the north.  We soon discovered that much like our other vacations, this one was going to be about the food.

Breakfast was at Biscuit Bitch, this awesome and unapologetically profane purveyor of greasy, fatty comforting foods where biscuits are not only the vehicle for salty, crispy fried bacon and spicy hot links–biscuits in these parts reigned queen.   As evidenced by his facial expressions, JJ admitted to “having problems with the inappropriate language” and I struggled with having to explain why this word is only OK inside this place.  But somehow, his 9-year old mind could not fathom the importance of reappropriating words and symbols.  So we stuck to talking about how crispy the bacon was on his Bitchwitch (actual menu item) and how garlicky the grits were on my Hot Mess Bitch (same).  And their awesome playlist rotation that included 90s hits from Lauryn Hill and the Fugees, SWV, KD Lang, Dionne Farris–seeing a pattern yet?

We visited Pike Place Market everyday during our visit and after our initial excitement with the fish throwing at the fish market, we moved on to other more practical eateries which were easier on the wallet.

We found ourselves returning to Piroshky Piroshky again and again because it was filling and good.  Both sweet and savory kinds ran you about 5-6$ and so lunch for our little family of 3 was less than 20$.  But we always wound up spending twice that because we had to sample different varieties–they weren’t bad cold either as we snacked on them in our hotel room.

29750213_1892789057406365_849041953460372139_o

29872945_1892790630739541_6623847674267103835_o

The signs are what drew us to this Filipino eatery, Oriental Mart.  We never sampled the food but the lines at the counter and the multiple to go orders we saw were enough to convince us that this was a legit place.  I read all the signs and kept hearing my Tita Precy’s voice, the requisite Filipino accent with passive aggressive undertones and just a hint of hostile paranoia.  But Tita Precy also made really awesome pancit canton so the funky attitude was forgivable.  Almost.

o-2

I loved these signs


The Pike Place Chowder lines were long, so long that they had to separate them in two and put a line monitor out there to keep unobservant patrons from ignoring line #2, lining up in the back of  line #1 and thereby inciting a riot.  They moved that line fast though and within about 15-20 minutes we were seated and enjoying steaming bowls of hot chowder.

IMG_3058

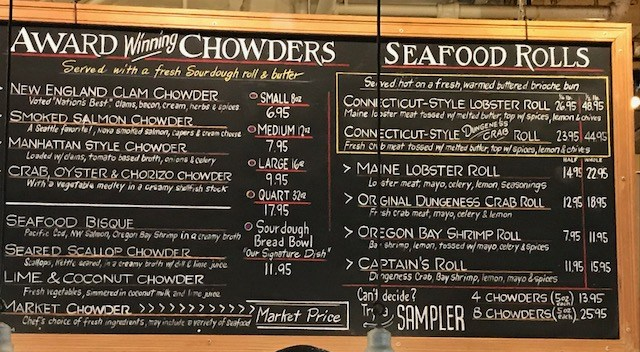
We opted for their 8-variety 5-oz sampler because we are an indecisive, greedy lot.  The chowders were creamy and thick with the salty, briny taste of the ocean.  The clams were perfectly cooked with just the right amount of give.  Admittedly, I didn’t have a favorite  because my palate isn’t evolved enough to distinguish between each chowder but they were all delicious.  My only regret was not coming back for their seafood rolls.

IMG_3062

Nothing like chowder on a cold and rainy Seattle day

Beecher’s Handmade cheese was probably our most disappointing find.  It was only OK and didn’t quite live up to the Yelp hype.  The ‘World’s Best’ Mac and Cheese was definitely sharp and very cheesy but the bechamel sauce was a little gritty and had a slightly pebbly texture which suggests that the cheese may have been melted too quickly causing the protein to clump up.

Pro tip: Come at opening, 9am for shorter crowds and a front row seat to their cheesemaking action.

C7516832-E754-4EFB-9C2C-5B543AB2B411

Meh

C6904708-6D94-4622-9512-8E34BF4FEA9D

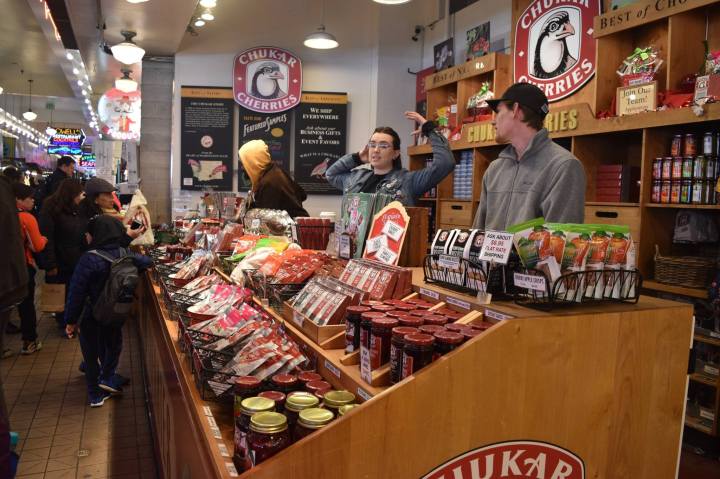
The Chukar Cherries origin story I imagine is a lot like the story of the first person who ever tried to eat an oyster.  Company founder Pam Montgomery one day basically decided to try some shriveled up, going bad cherries on her family’s cherry tree orchard and luckily found that the cherries had become chewy over time and had sweetened in their own natural juices.  Many innovations later, Chukar Cherries was born.  On the main floor of the market, we returned to their stand twice twice and wound up getting 10 bags of varying flavors with intentions to give them away as souvenirs.  We’ll see.

29872165_1892790364072901_279845426801670930_o

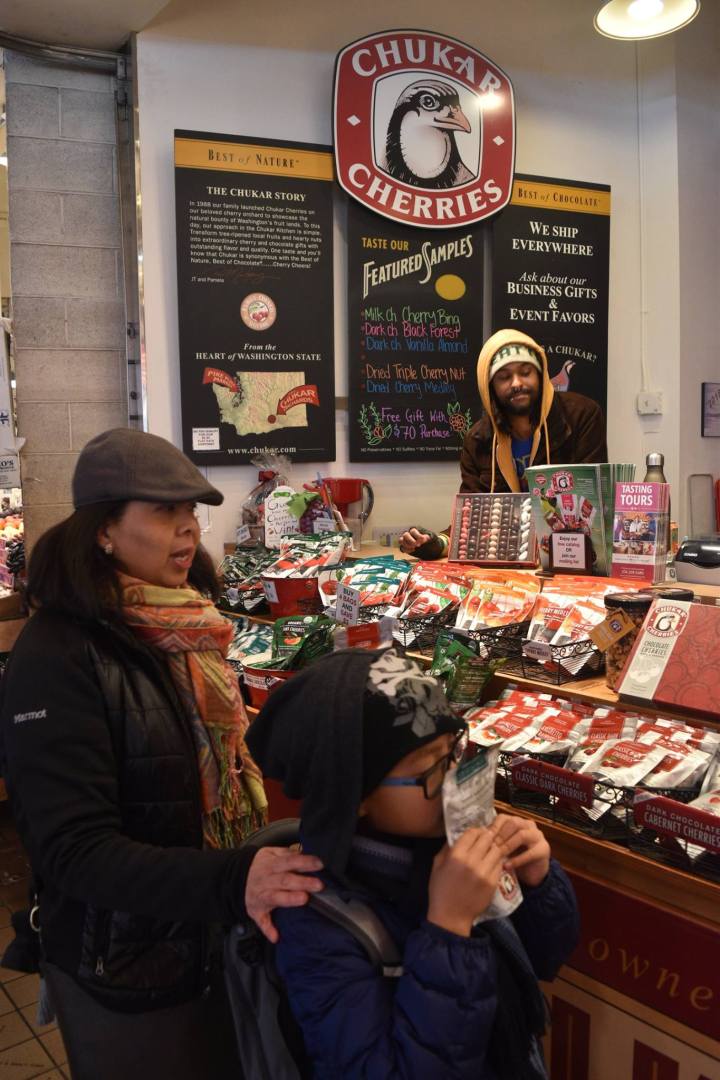
JJ loved the smell of sweet chocolate covered cherries

29750030_1892789720739632_5284072810760863185_o

Ellenos Yogurt was our final find. Their yogurt is so creamy and tasted so decadent that you’ll swear you were eating melted ice cream.  We sampled the passion fruit, mango and lemon meringue before finally settling on the marionberry with pie crust crumbles to give it that extra crunch and a touch of sweetness to balance out that tart flavor.

BAC7F3D8-ACD1-49A0-A483-BE06BB45F298

As you can see, we did most of our eating in Pike Place Market.  It was convenient, fast and cheap.  For families the variety makes it possible to sample different things while remaining budget conscious.

Oh, and we saw a bunch of awesome things too like the Space Needle (undergoing renovations til summer, I would skip this until June as most of the areas were closed off and boarded up ), the Bill Speidel Underground Tour (go for the history and the interesting background on what happens when city planning decisions aren’t well thought out).  The Pacific Science Center will entertain your kid for hours with the many interactive exhibits and displays and the enclosed butterfly house.   The infamous gum Wall was gross but it’s part of the eclectic weirdness that is Seattle so you can’t miss it.  Most of all, don’t miss the Chihuly Gardens and the glass blowing demo.  You’ll be awed and amazed by the works of art lovingly curated in this space.

9716905F-B7E2-42C3-B63D-16522DFD4D8B

Flagship Starbucks: long lines that moved fast

13F4626C-4FF6-4BF7-99FE-0FF36C78A254

Chihuly Garden glass sculpture

948571CE-34F7-486A-9EC5-3AB5E8F8D2AA

From JJs perspective, one of the most beautiful displays in Chihuly Garden

497D500F-D67C-4559-870C-FC9651ECEA02

Bill Speidel’s Underground Tour

A50CAC24-B8E7-48DA-A2EE-63AF8A22F491

En route to the top of the Space Needle (which was meh in its current state)

5373D43A-A235-4071-BB6A-56288E747DCD

“I dare you to stick me to the gum wall!”


Panettone Bread Pudding

Standard

During the holidays, I get really ambitious and have visions of making instead of  buying all my Christmas presents.  This almost never happens because I am told I have really good taste in gift cards.

image

One year, our friends participated in a gift exchange where the only rule was that every present had to be homemade. This was our bounty of homemade jams, freshly baked rolls, breads, Meyer lemon curds, bread puddings.  We did this exactly one year.

From time to time though I still get inspired  to make my gifts and I channel said inspiration from my grandmother’s metal mixing bowl.  My mom tells me this bowl is almost as old as her which means it’s hovering around 70, or as my mother reports, 64.  She and this bowl have been 64 for the past 7 years.  My Christmas presents this year were Panettone Bread Pudding.  Panettone is a rich, eggy, spongy Italian bread dotted with candied fruit, nuts and raisins.  And because I’m using Lola’s bowl and bread puddings are super easy to make, it’s really hard to mess up.

Ingredients:

1 pound loaf Panettone, cubed/torn in 2-inch pieces
2 1/2 cups heavy cream
1 1/2 cups milk
8 eggs
1 cup sugar
1 tsp vanilla extract

Procedure:

  • Spread Panettone bread pieces in a greased 9x13x2 baking pan. Leave uncovered in the pan overnight to dry out and make it stale. The dryer the bread the better as it helps soak up the custard.
  • Whisk all the wet ingredients together and pour the custard mixture over the panettone bread pieces. Press down gently to make sure all pieces are submerged.
  • Bake in a 350-degree oven for 45 minutes to an hour or until the center is set and no longer jiggles.*
  • Drizzle some melted vanilla ice cream over the panettone bread pudding for a decadent vanilla cream sauce and sprinkle some turbinado sugar to make it extra comforting.

*Water baths or bain marie are allegedly essential for bread puddings because custard likes to be heated slowly to prevent curdling.  The water bath keeps it from cooking too quickly.  I’ve never done this and my bread puddings have come out fine.

Screen Shot 2018-02-25 at 10.16.01 PM.png